> ## Documentation Index
> Fetch the complete documentation index at: https://docs.pockla.io/llms.txt
> Use this file to discover all available pages before exploring further.
# Adding Contacts
> Import and create contacts in Pockla
Pockla provides multiple ways to add contacts to your workspace—from individual manual entry to bulk CSV imports.
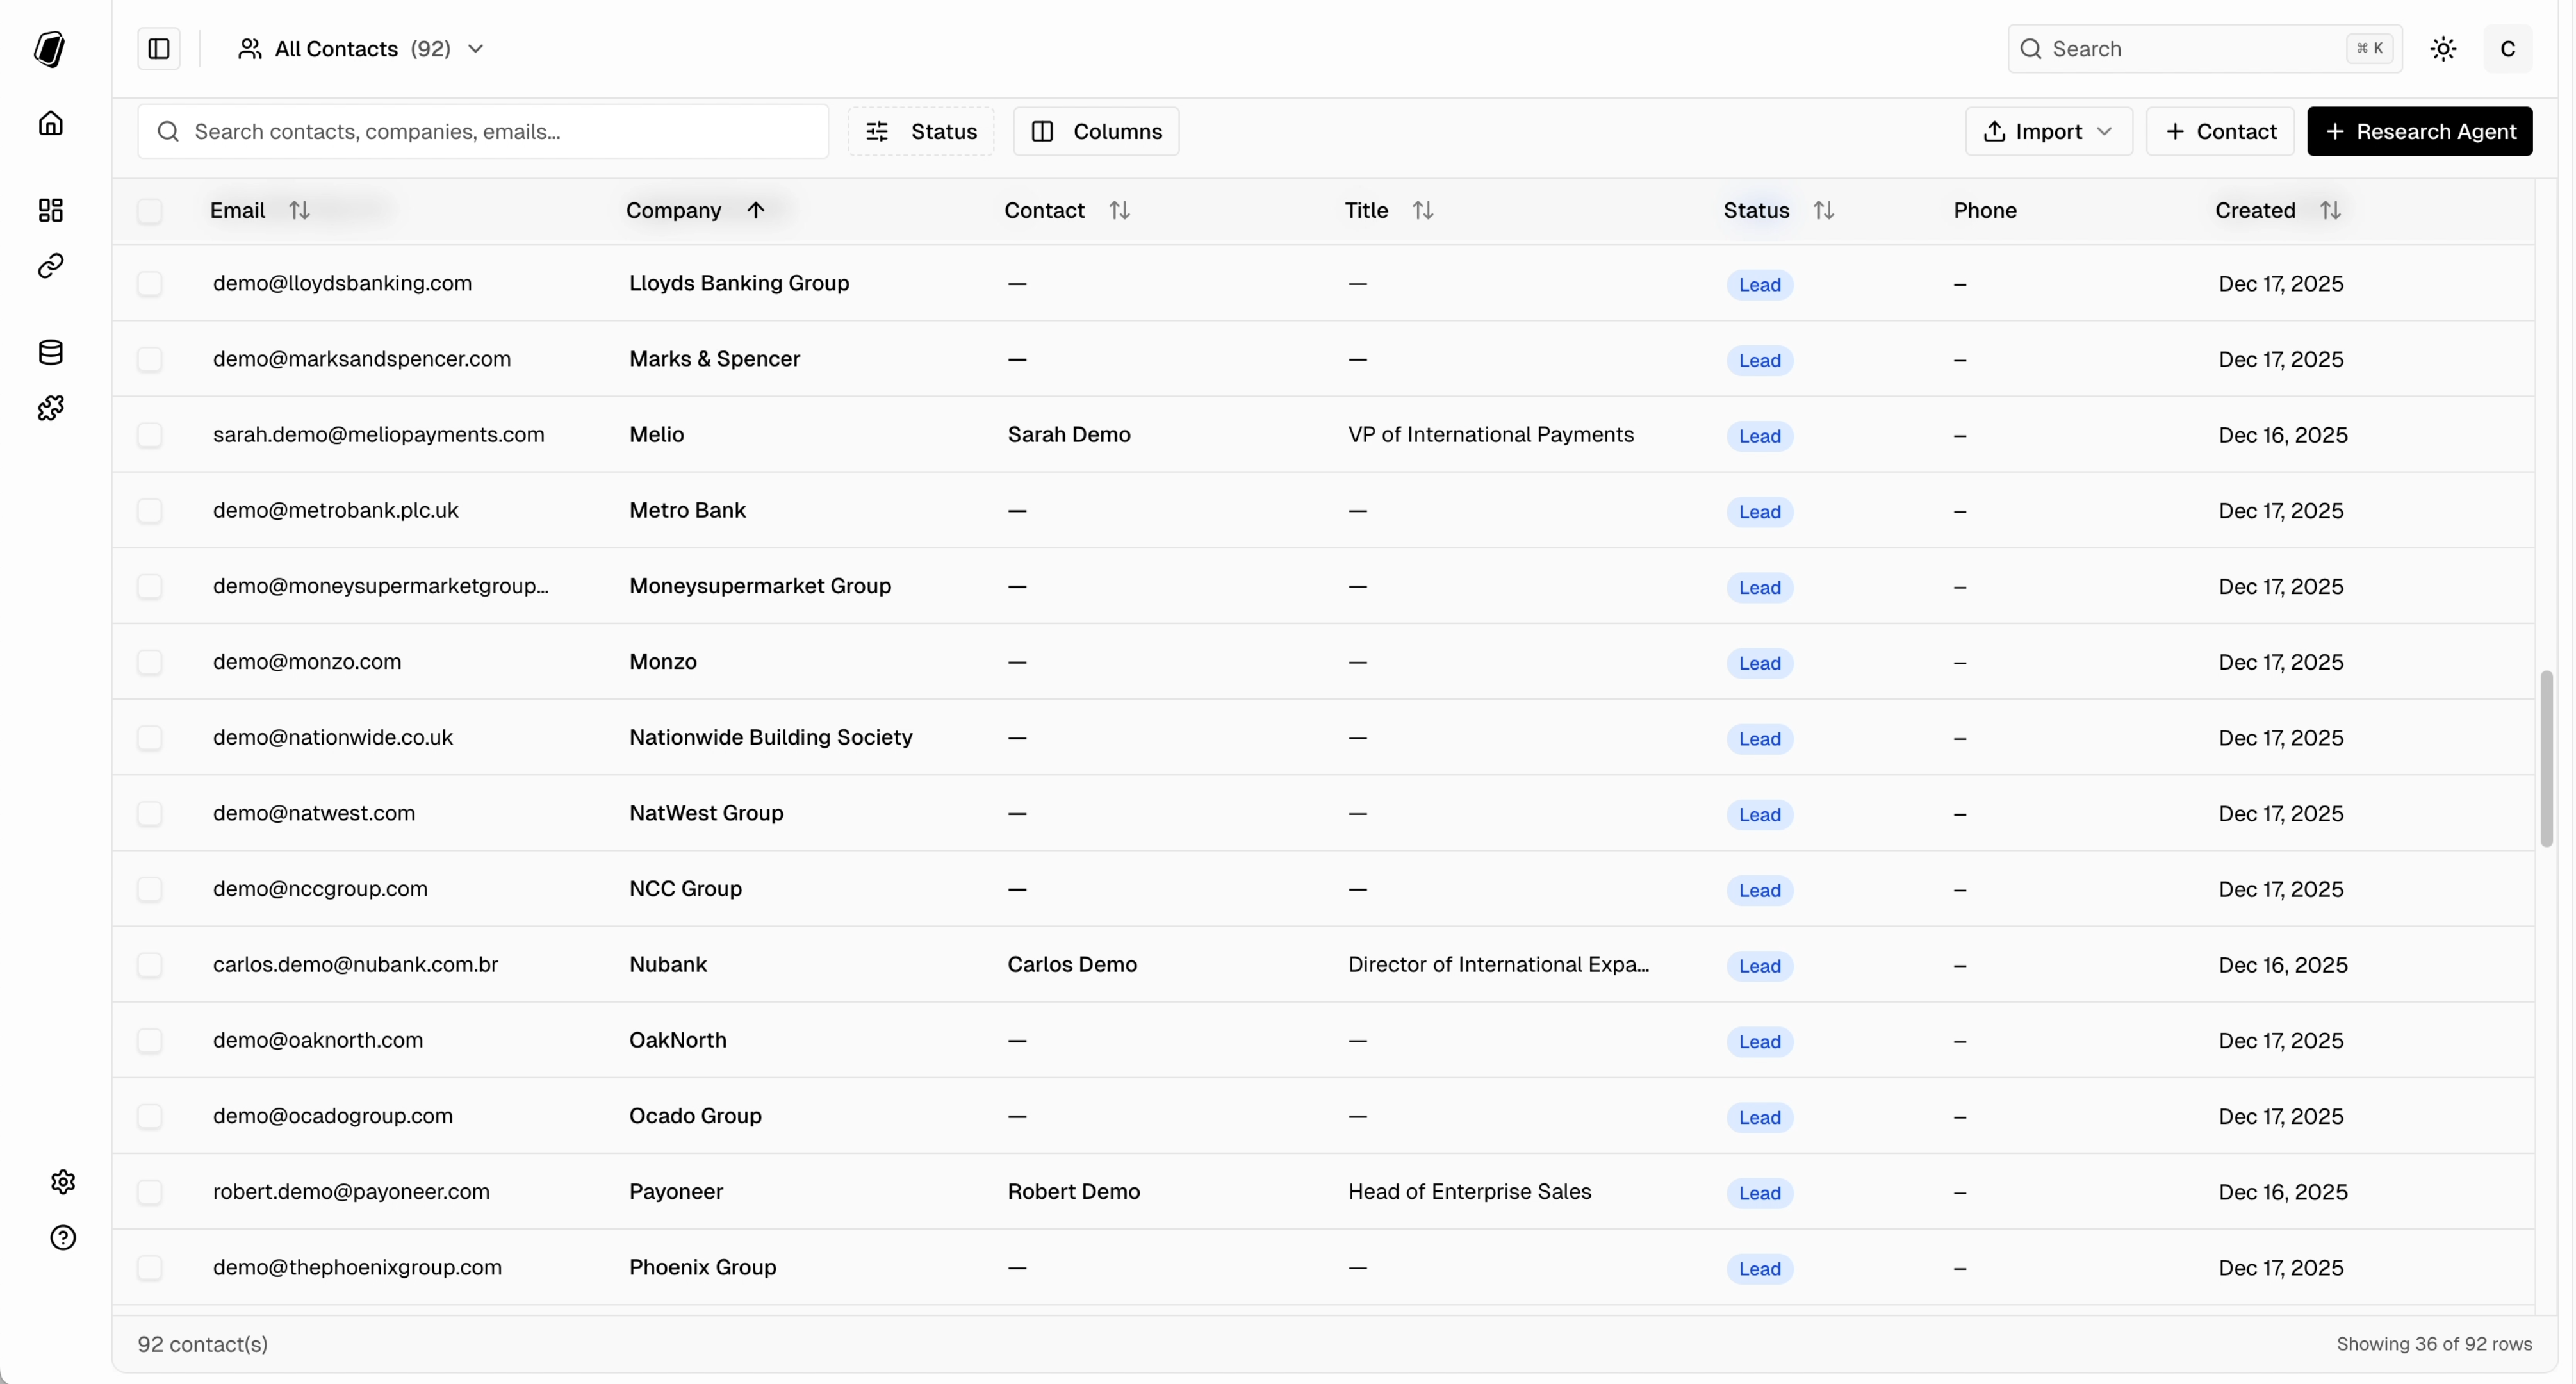 ## Manual Entry
Add contacts one at a time directly in the app. This is ideal for quickly adding new leads as you encounter them.
From the **Contacts** page, click the **Contact** button in the toolbar.
## Manual Entry
Add contacts one at a time directly in the app. This is ideal for quickly adding new leads as you encounter them.
From the **Contacts** page, click the **Contact** button in the toolbar.
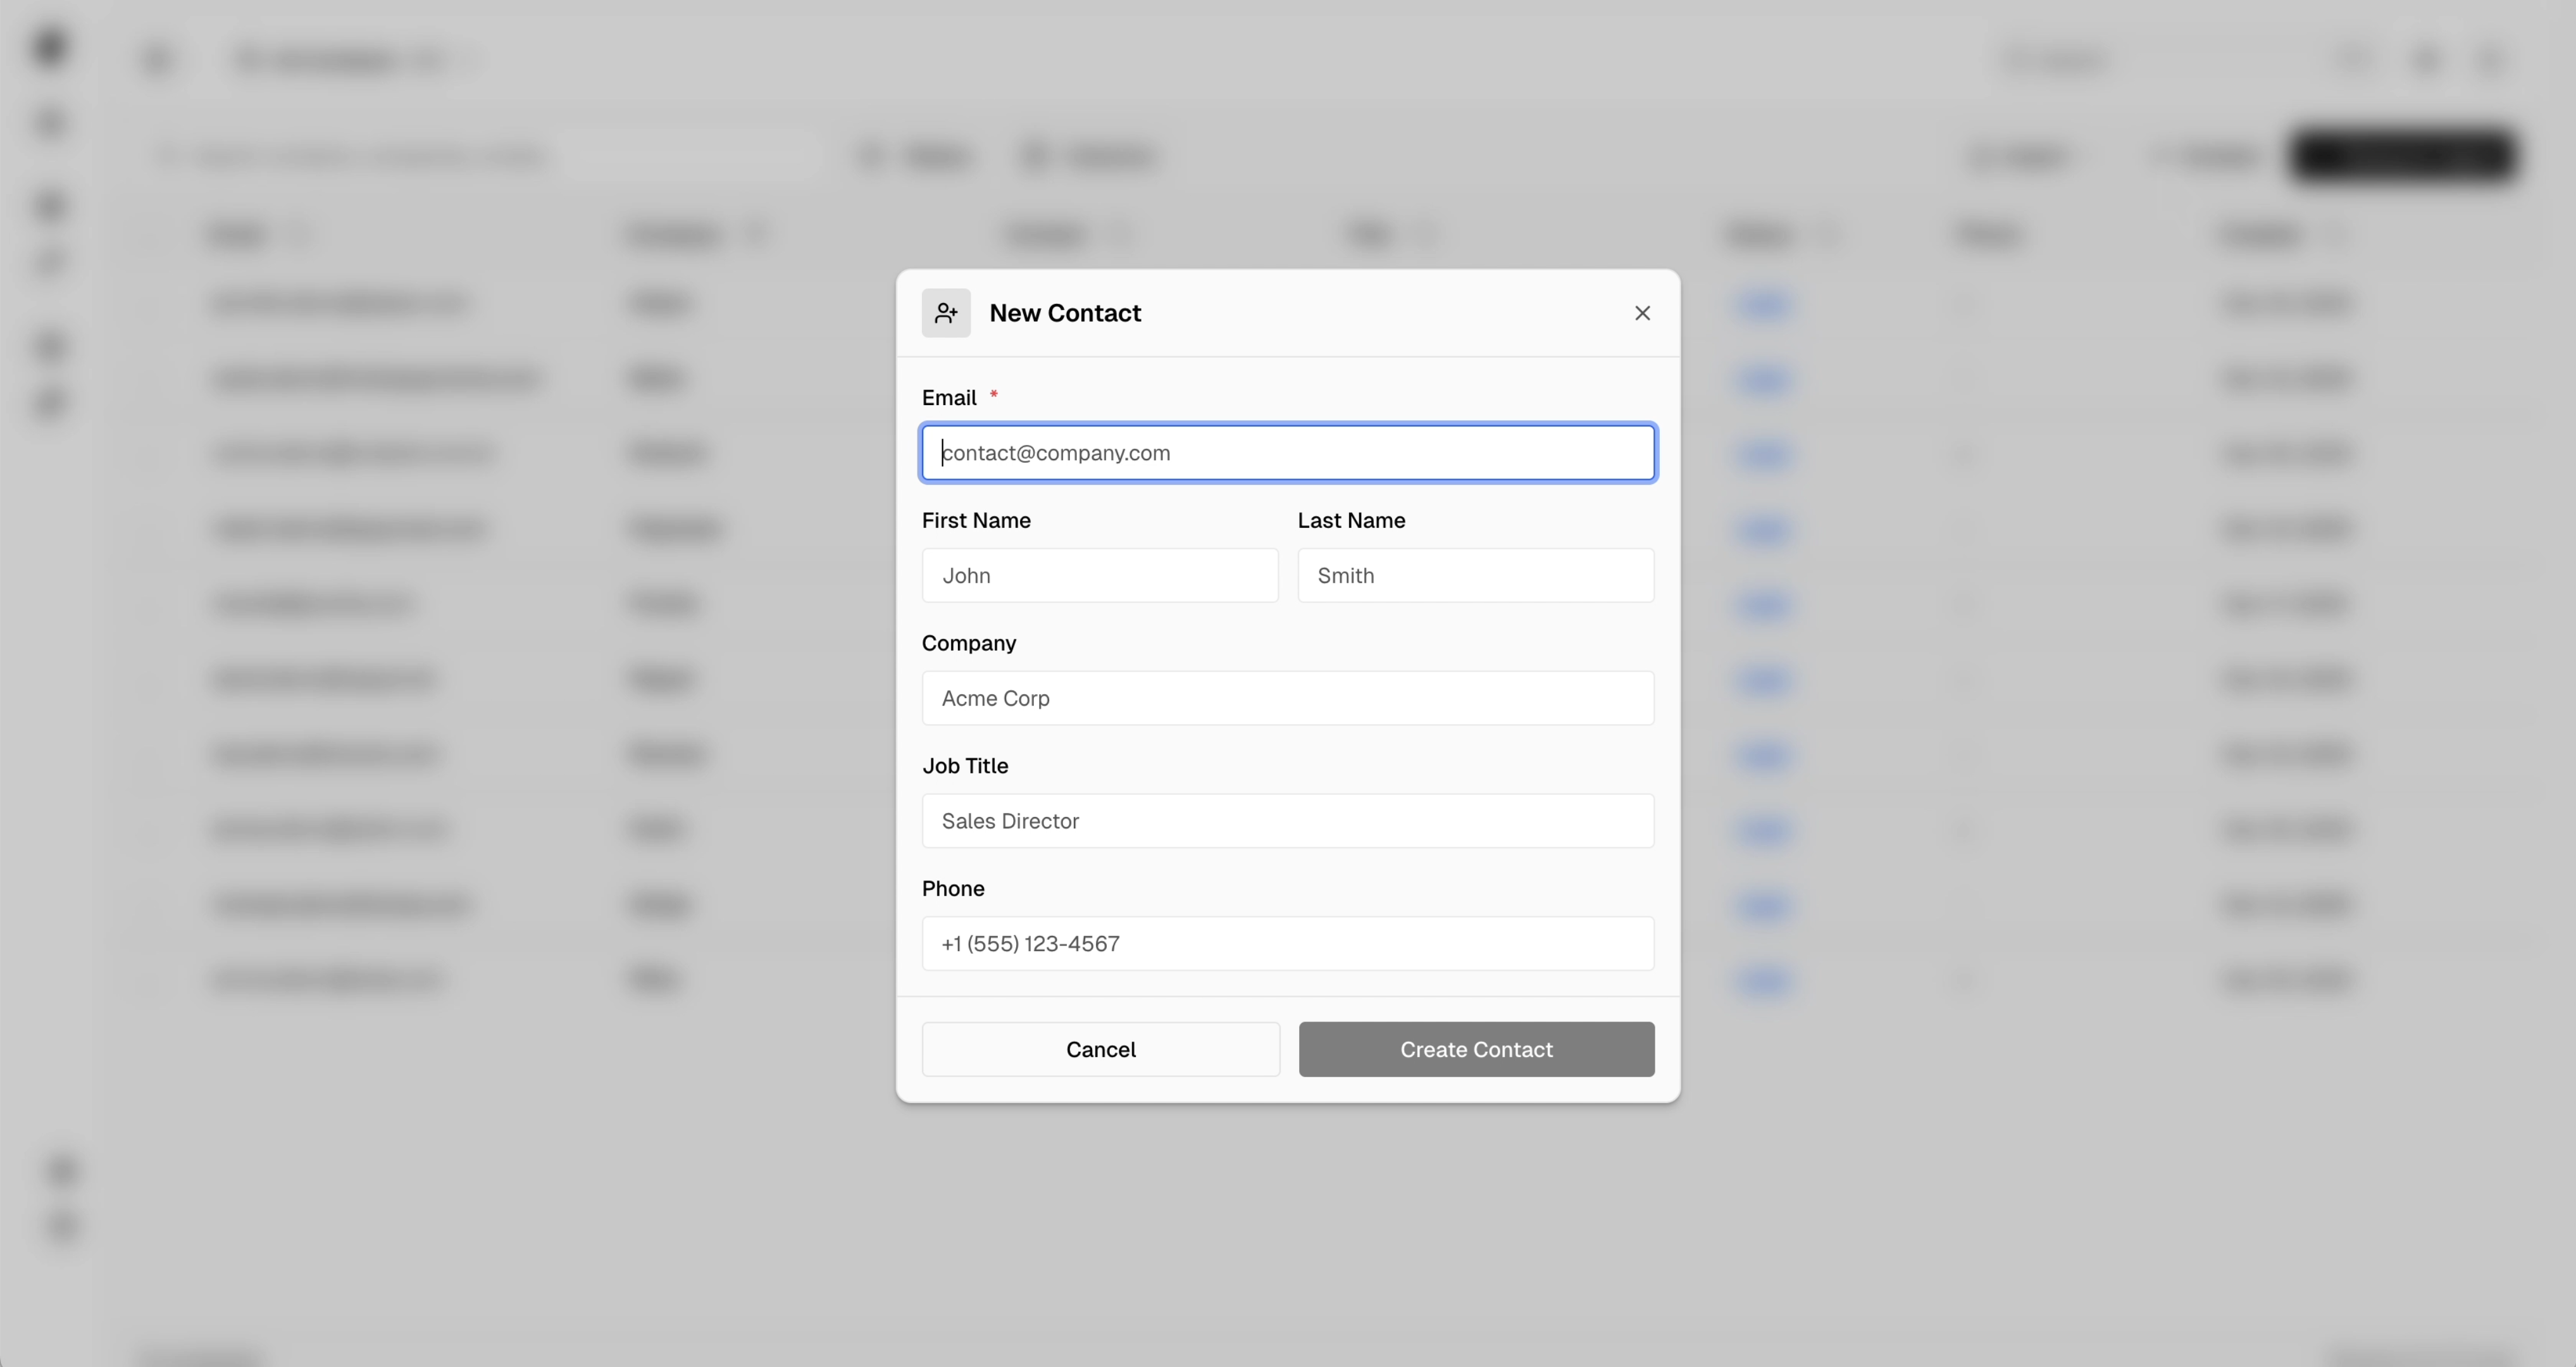 Fill in the contact information:
| Field | Required | Description |
| -------------- | -------- | -------------------------------------------------------- |
| **Email** | Yes | The contact's email address (used as primary identifier) |
| **First Name** | No | Contact's first name |
| **Last Name** | No | Contact's last name |
| **Company** | No | Organization or company name |
| **Job Title** | No | Role or position |
| **Phone** | No | Phone number in any format |
Click **Create Contact**. The contact will be added immediately and appear in your contacts table.
After creating a contact from the contacts page, you'll stay on the contacts page with the list refreshed. When creating from a board, you'll be taken directly to that contact's board view.
## CSV Import
Import multiple contacts at once using a CSV file. This is the fastest way to bulk-add contacts from spreadsheets, exports from other tools, or purchased lists.
### Preparing Your CSV
Your CSV file should include headers in the first row. Pockla recognizes these standard column names:
| Column Name | Maps To | Notes |
| ------------------------------------ | ---------- | --------------------------------- |
| `email` | Email | **Required** - primary identifier |
| `first_name` or `firstName` | First Name | |
| `last_name` or `lastName` | Last Name | |
| `company` | Company | |
| `job_title` or `jobTitle` or `title` | Job Title | |
| `phone` | Phone | |
| `notes` | Notes | |
```csv theme={null}
email,first_name,last_name,company,job_title,phone
john@acme.com,John,Smith,Acme Corp,Sales Director,+1 555 123 4567
jane@startup.io,Jane,Doe,Startup Inc,CEO,
mike@bigco.com,Mike,Johnson,BigCo,VP Marketing,+44 20 7946 0958
```
### Import Steps
Go to **Contacts** from the sidebar navigation.
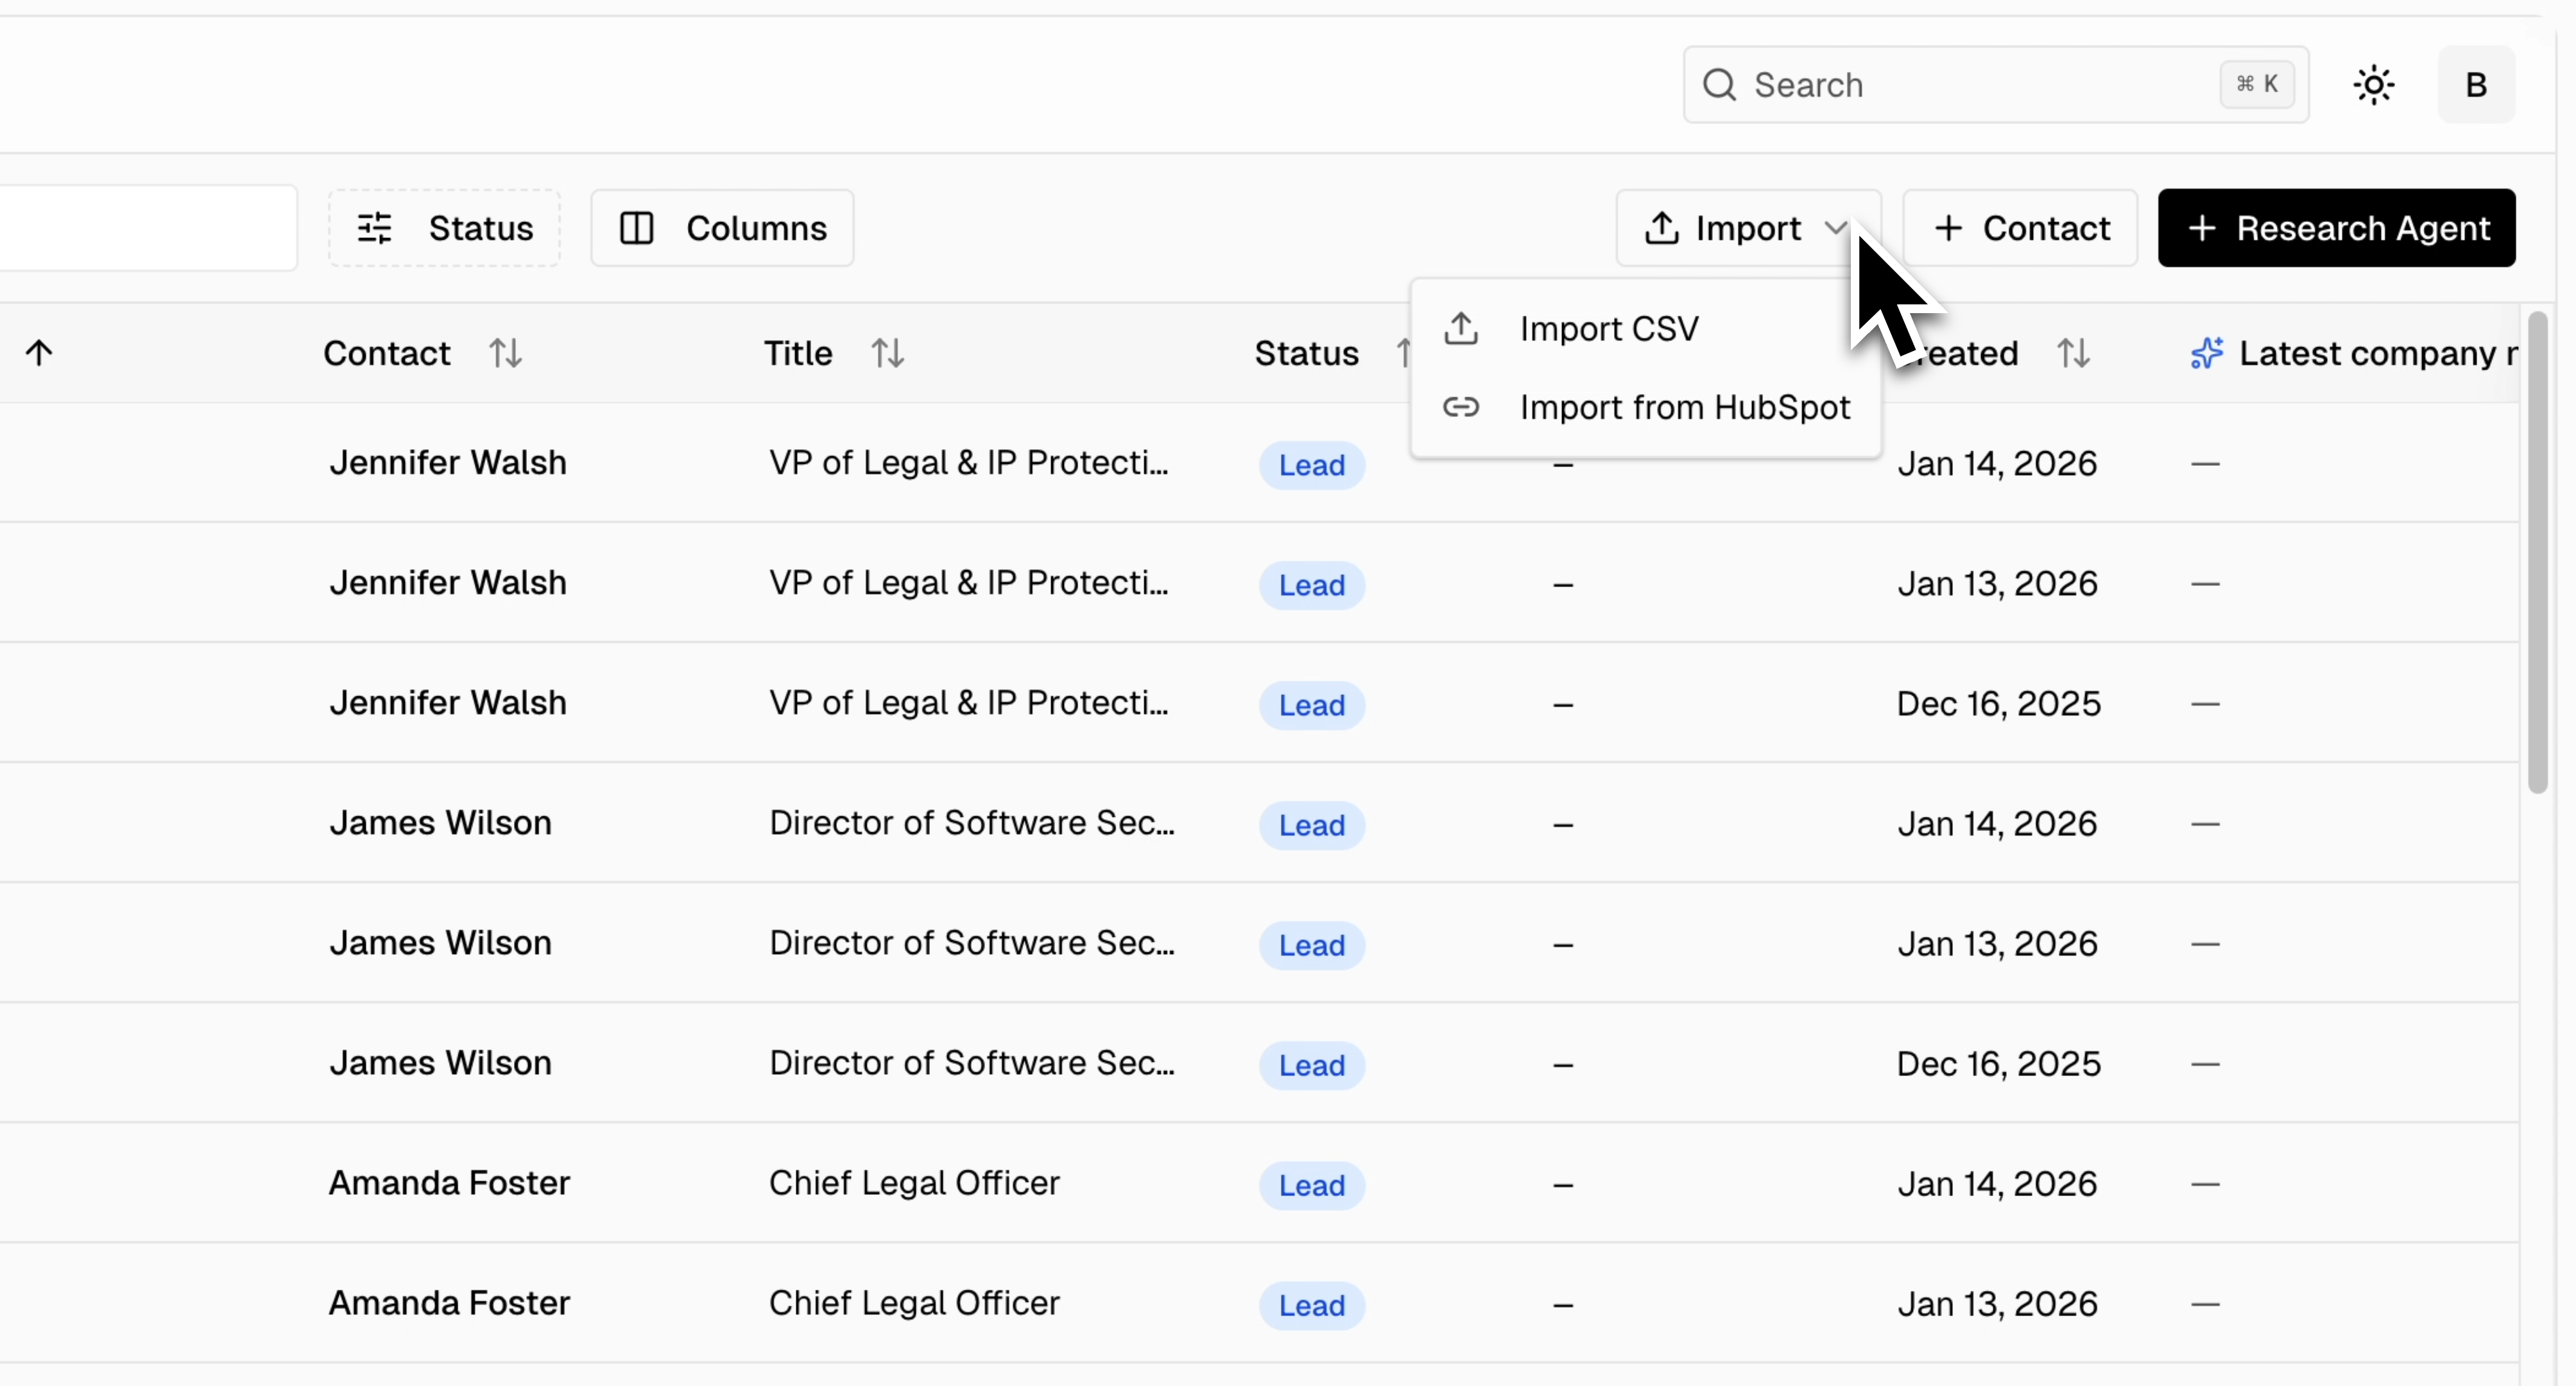
Click the **Import** button in the toolbar.
Fill in the contact information:
| Field | Required | Description |
| -------------- | -------- | -------------------------------------------------------- |
| **Email** | Yes | The contact's email address (used as primary identifier) |
| **First Name** | No | Contact's first name |
| **Last Name** | No | Contact's last name |
| **Company** | No | Organization or company name |
| **Job Title** | No | Role or position |
| **Phone** | No | Phone number in any format |
Click **Create Contact**. The contact will be added immediately and appear in your contacts table.
After creating a contact from the contacts page, you'll stay on the contacts page with the list refreshed. When creating from a board, you'll be taken directly to that contact's board view.
## CSV Import
Import multiple contacts at once using a CSV file. This is the fastest way to bulk-add contacts from spreadsheets, exports from other tools, or purchased lists.
### Preparing Your CSV
Your CSV file should include headers in the first row. Pockla recognizes these standard column names:
| Column Name | Maps To | Notes |
| ------------------------------------ | ---------- | --------------------------------- |
| `email` | Email | **Required** - primary identifier |
| `first_name` or `firstName` | First Name | |
| `last_name` or `lastName` | Last Name | |
| `company` | Company | |
| `job_title` or `jobTitle` or `title` | Job Title | |
| `phone` | Phone | |
| `notes` | Notes | |
```csv theme={null}
email,first_name,last_name,company,job_title,phone
john@acme.com,John,Smith,Acme Corp,Sales Director,+1 555 123 4567
jane@startup.io,Jane,Doe,Startup Inc,CEO,
mike@bigco.com,Mike,Johnson,BigCo,VP Marketing,+44 20 7946 0958
```
### Import Steps
Go to **Contacts** from the sidebar navigation.
Click the **Import** button in the toolbar.
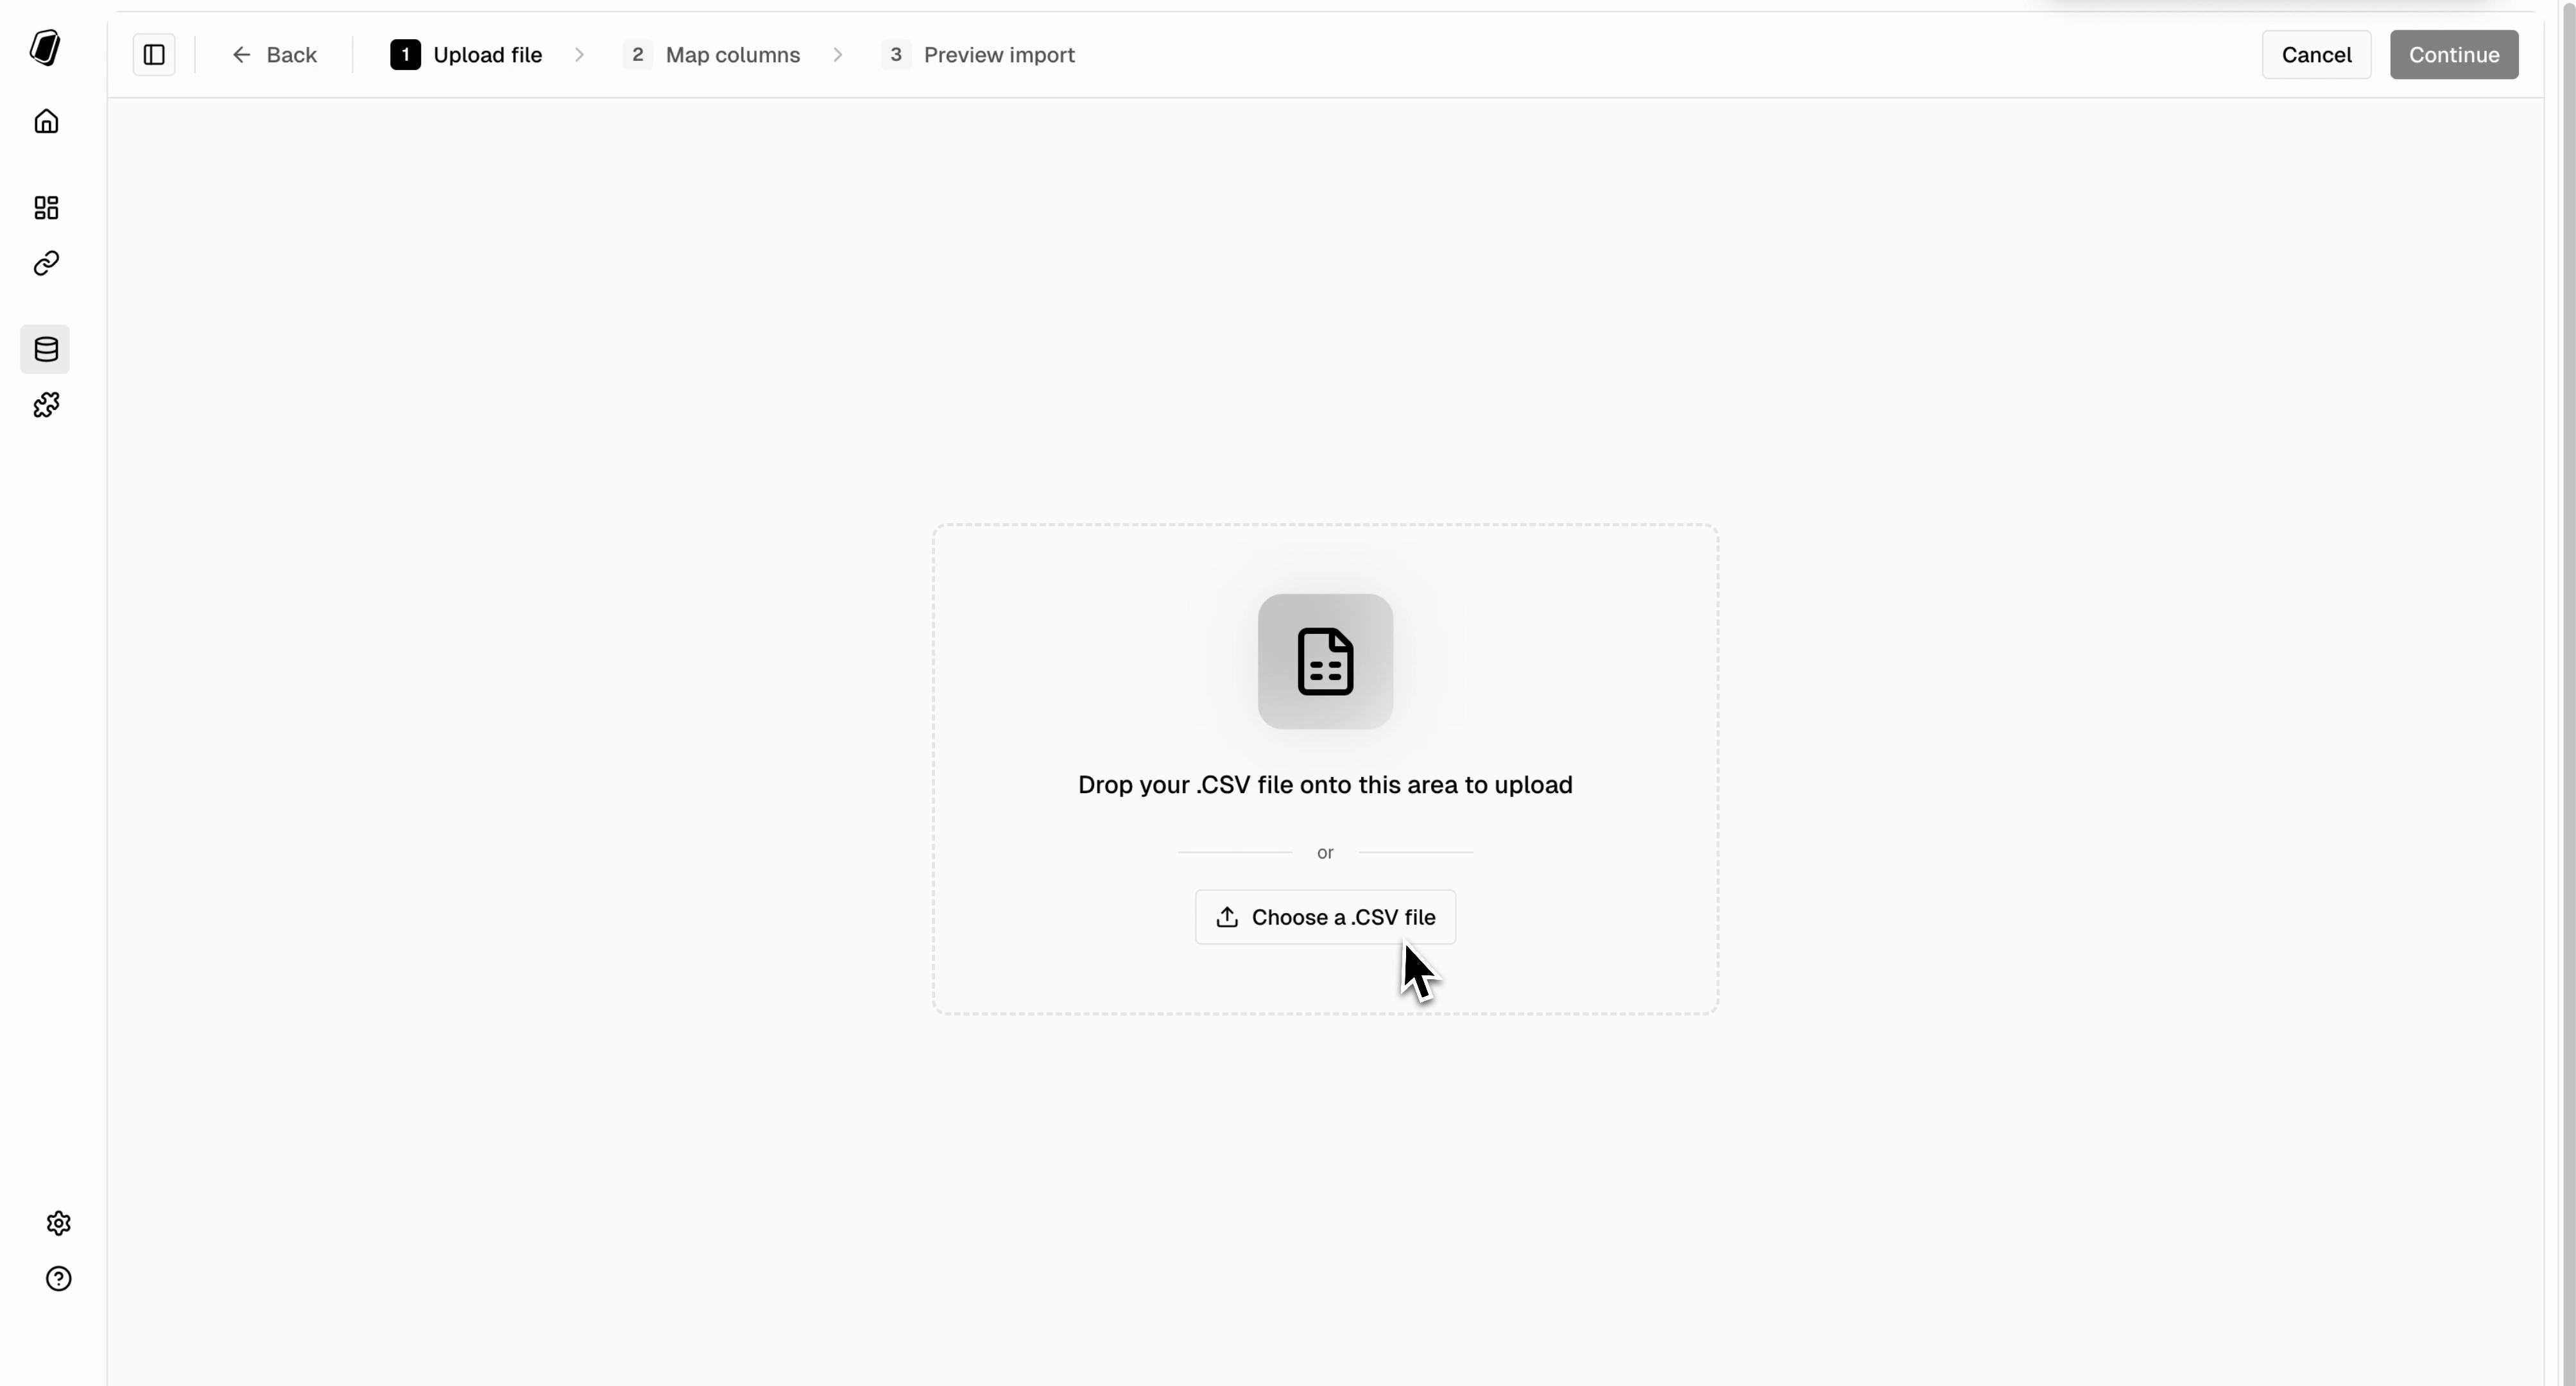
 Drag and drop your CSV file, or click to browse and select it.
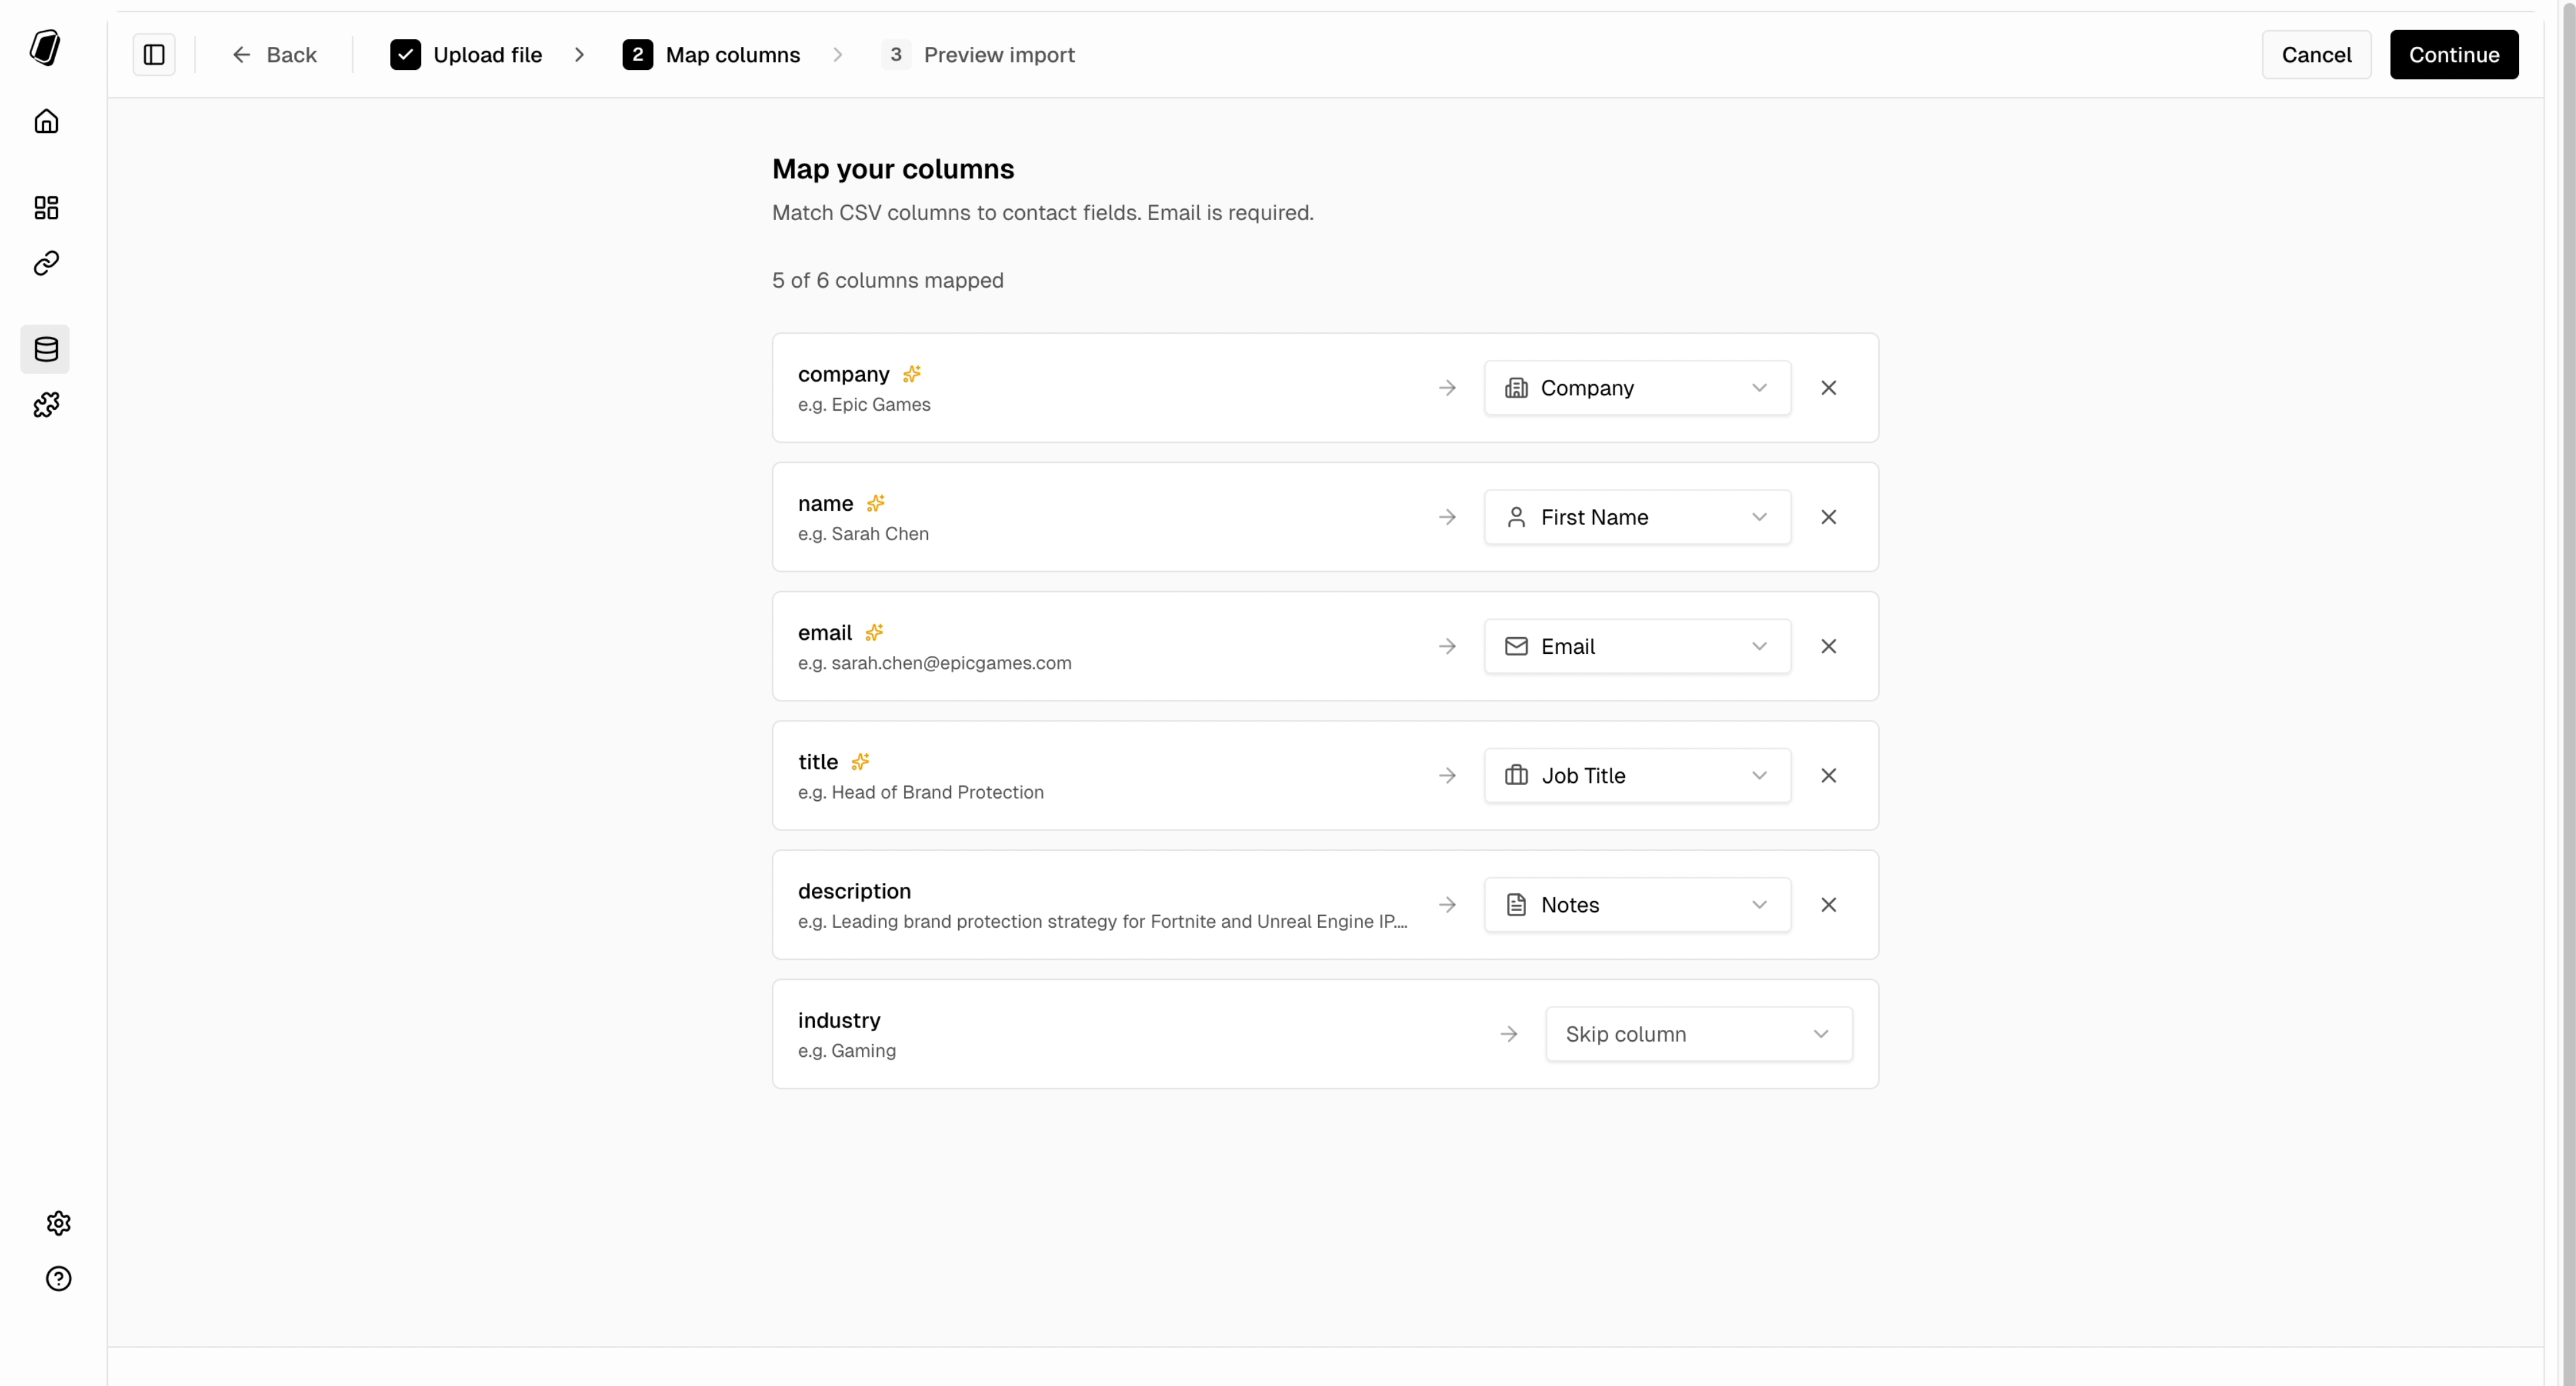
 Pockla will attempt to auto-match your CSV columns to contact fields. Review and adjust any mappings that weren't detected correctly.
* Green checkmarks indicate matched columns
* Use dropdowns to manually map unrecognized columns
* Skip columns you don't want to import
Pockla will attempt to auto-match your CSV columns to contact fields. Review and adjust any mappings that weren't detected correctly.
* Green checkmarks indicate matched columns
* Use dropdowns to manually map unrecognized columns
* Skip columns you don't want to import
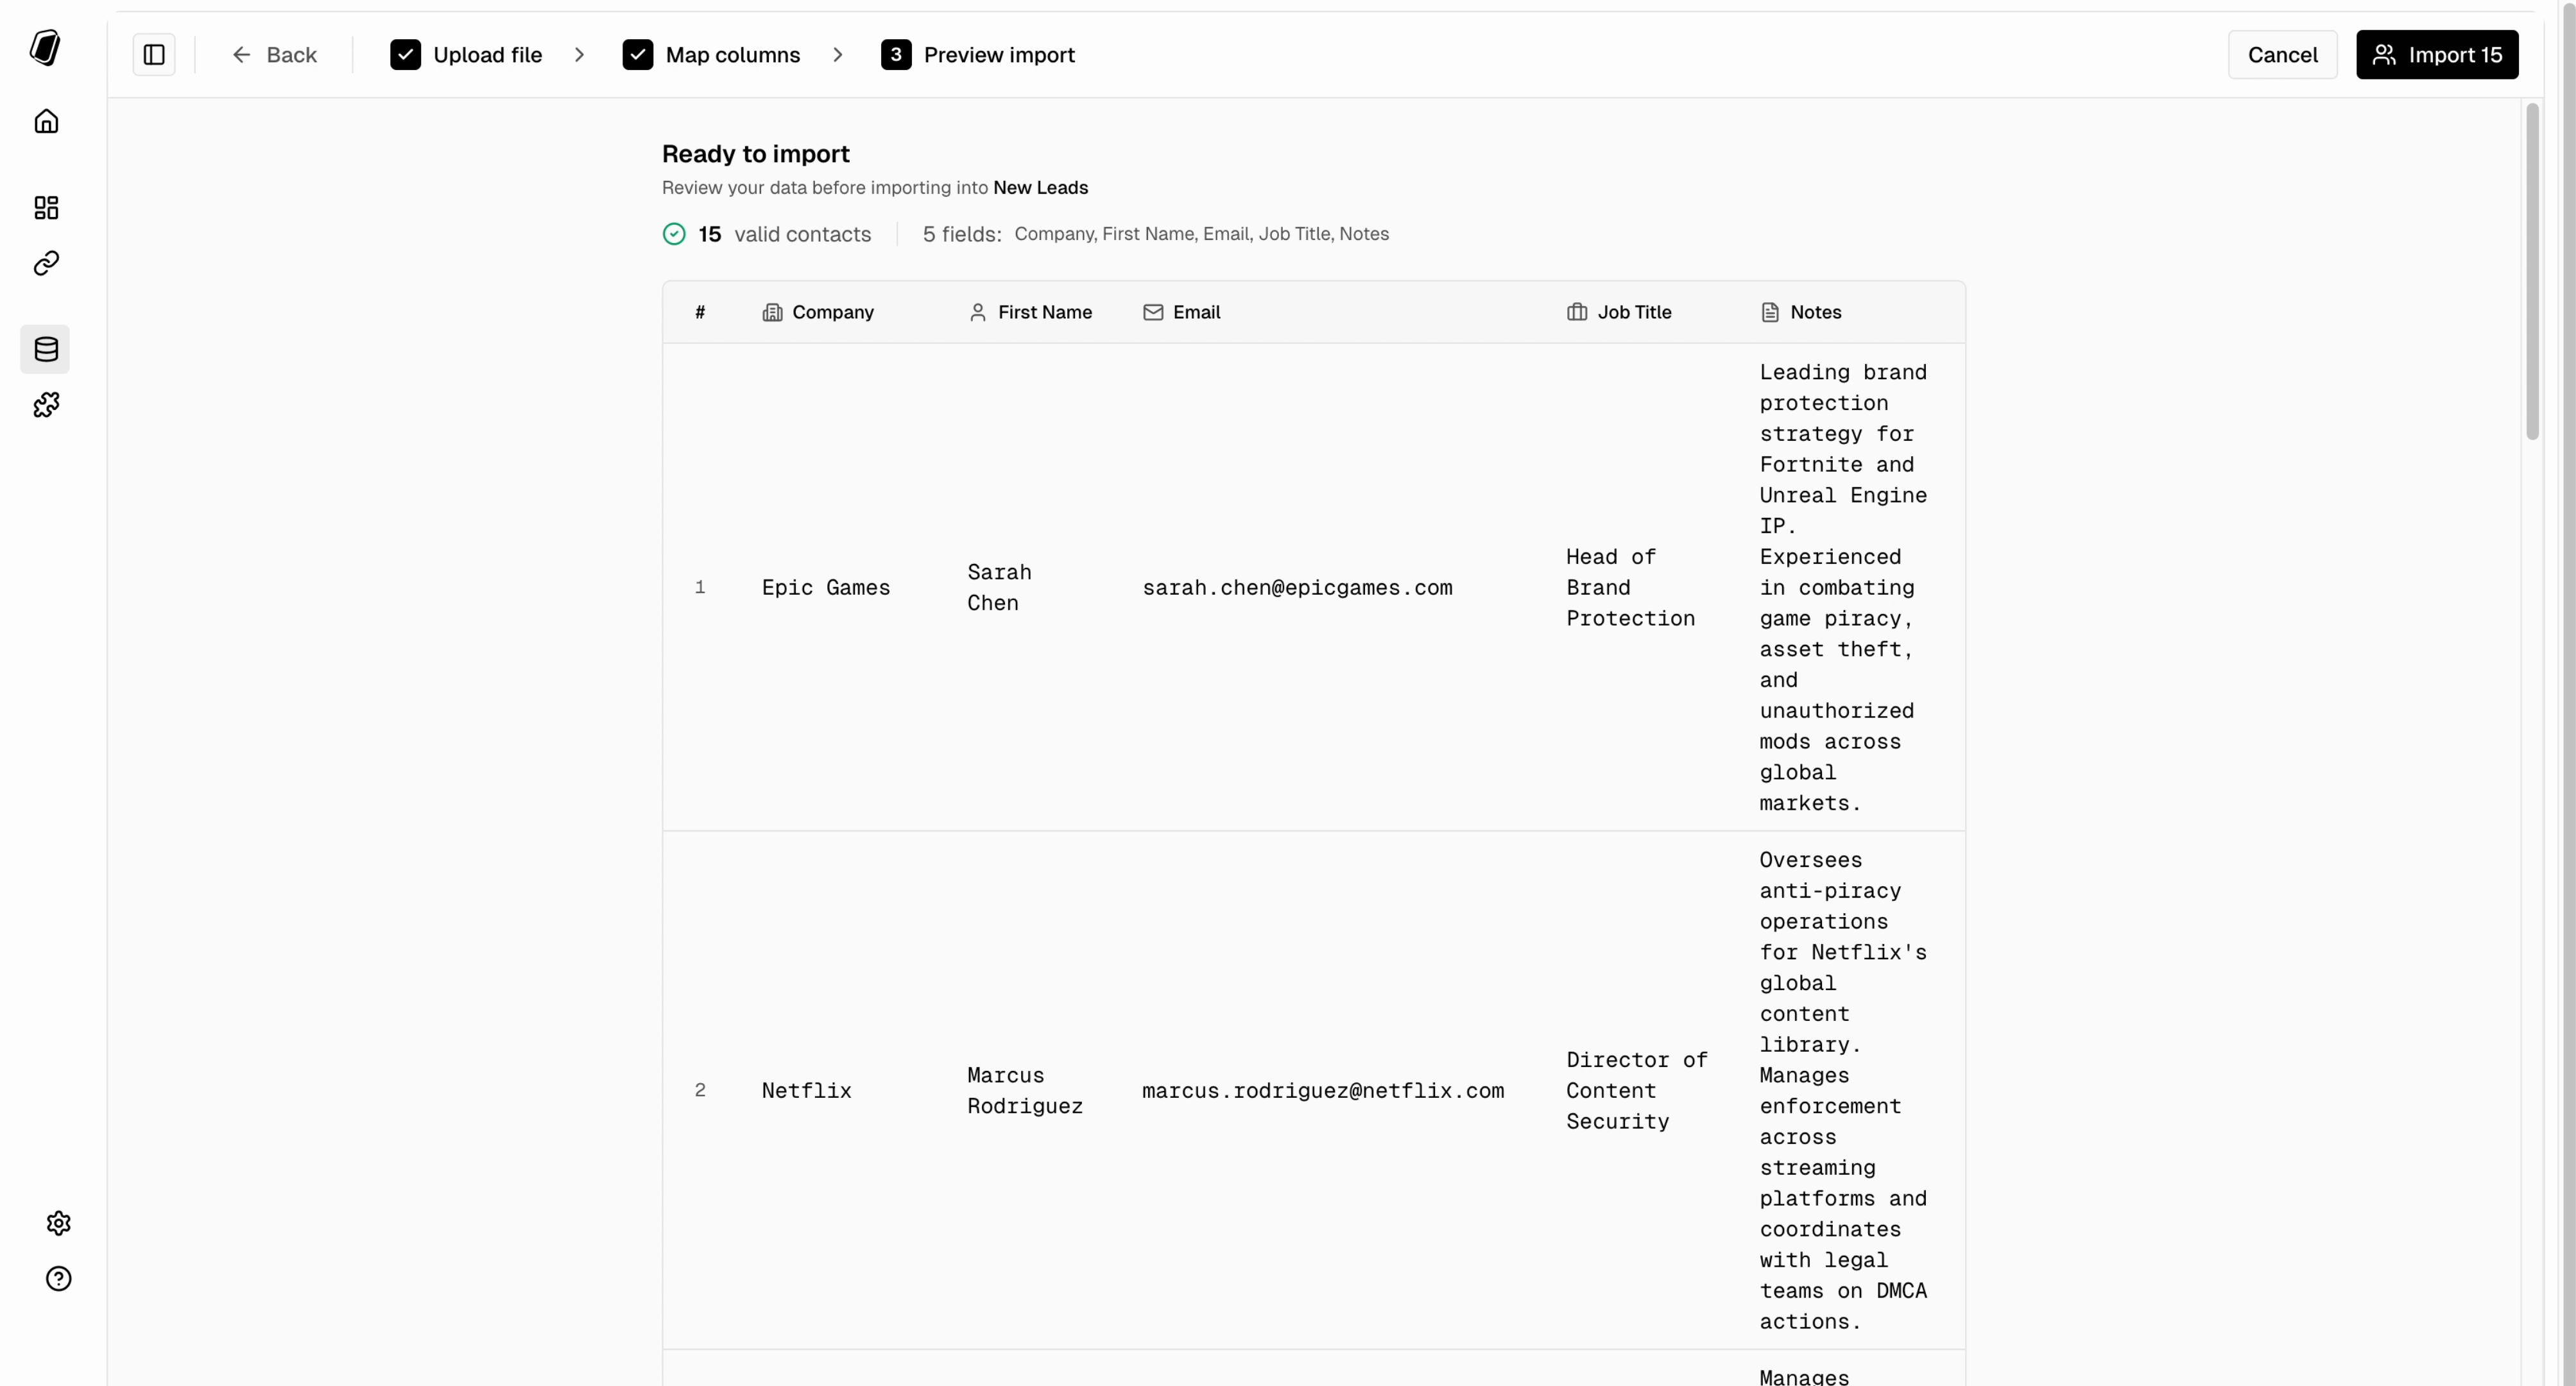
 Preview the data that will be imported. Check for any issues or formatting problems, then click **Import**.
 ### Handling Duplicates
Pockla uses **email address** as the unique identifier for contacts:
* **New emails**: Creates a new contact
* **Existing emails**: Updates the existing contact with new data
* **Empty fields**: Won't overwrite existing data (only fills in blanks)
Contacts without a valid email address will be skipped during import.
## Contact Fields
### Standard Fields
Every contact in Pockla has these built-in fields:
| Field | Type | Description |
| ---------- | ------ | ------------------------------------ |
| Email | String | Primary identifier (**required**) |
| First Name | String | Contact's first name |
| Last Name | String | Contact's last name |
| Company | String | Company or organization |
| Job Title | String | Role or position |
| Phone | String | Phone number |
| Notes | Text | Free-form notes |
| Status | Select | Lead, Prospect, Customer, or Churned |
| Created | Date | When the contact was added |
### Contact Status
Every contact can have a status to track where they are in your pipeline:
New contacts, not yet qualified
Qualified, actively working
Converted customers
Former customers
### Enrichment Columns
When you create enrichment templates (AI-powered research), they appear as additional columns in your contacts table. These columns show:
* **—** No data yet
* **Generating** (with spinner) Research in progress
* **Preview text** Completed research (click to view full content)
* **Error icon** Generation failed (can retry)
### Handling Duplicates
Pockla uses **email address** as the unique identifier for contacts:
* **New emails**: Creates a new contact
* **Existing emails**: Updates the existing contact with new data
* **Empty fields**: Won't overwrite existing data (only fills in blanks)
Contacts without a valid email address will be skipped during import.
## Contact Fields
### Standard Fields
Every contact in Pockla has these built-in fields:
| Field | Type | Description |
| ---------- | ------ | ------------------------------------ |
| Email | String | Primary identifier (**required**) |
| First Name | String | Contact's first name |
| Last Name | String | Contact's last name |
| Company | String | Company or organization |
| Job Title | String | Role or position |
| Phone | String | Phone number |
| Notes | Text | Free-form notes |
| Status | Select | Lead, Prospect, Customer, or Churned |
| Created | Date | When the contact was added |
### Contact Status
Every contact can have a status to track where they are in your pipeline:
New contacts, not yet qualified
Qualified, actively working
Converted customers
Former customers
### Enrichment Columns
When you create enrichment templates (AI-powered research), they appear as additional columns in your contacts table. These columns show:
* **—** No data yet
* **Generating** (with spinner) Research in progress
* **Preview text** Completed research (click to view full content)
* **Error icon** Generation failed (can retry)
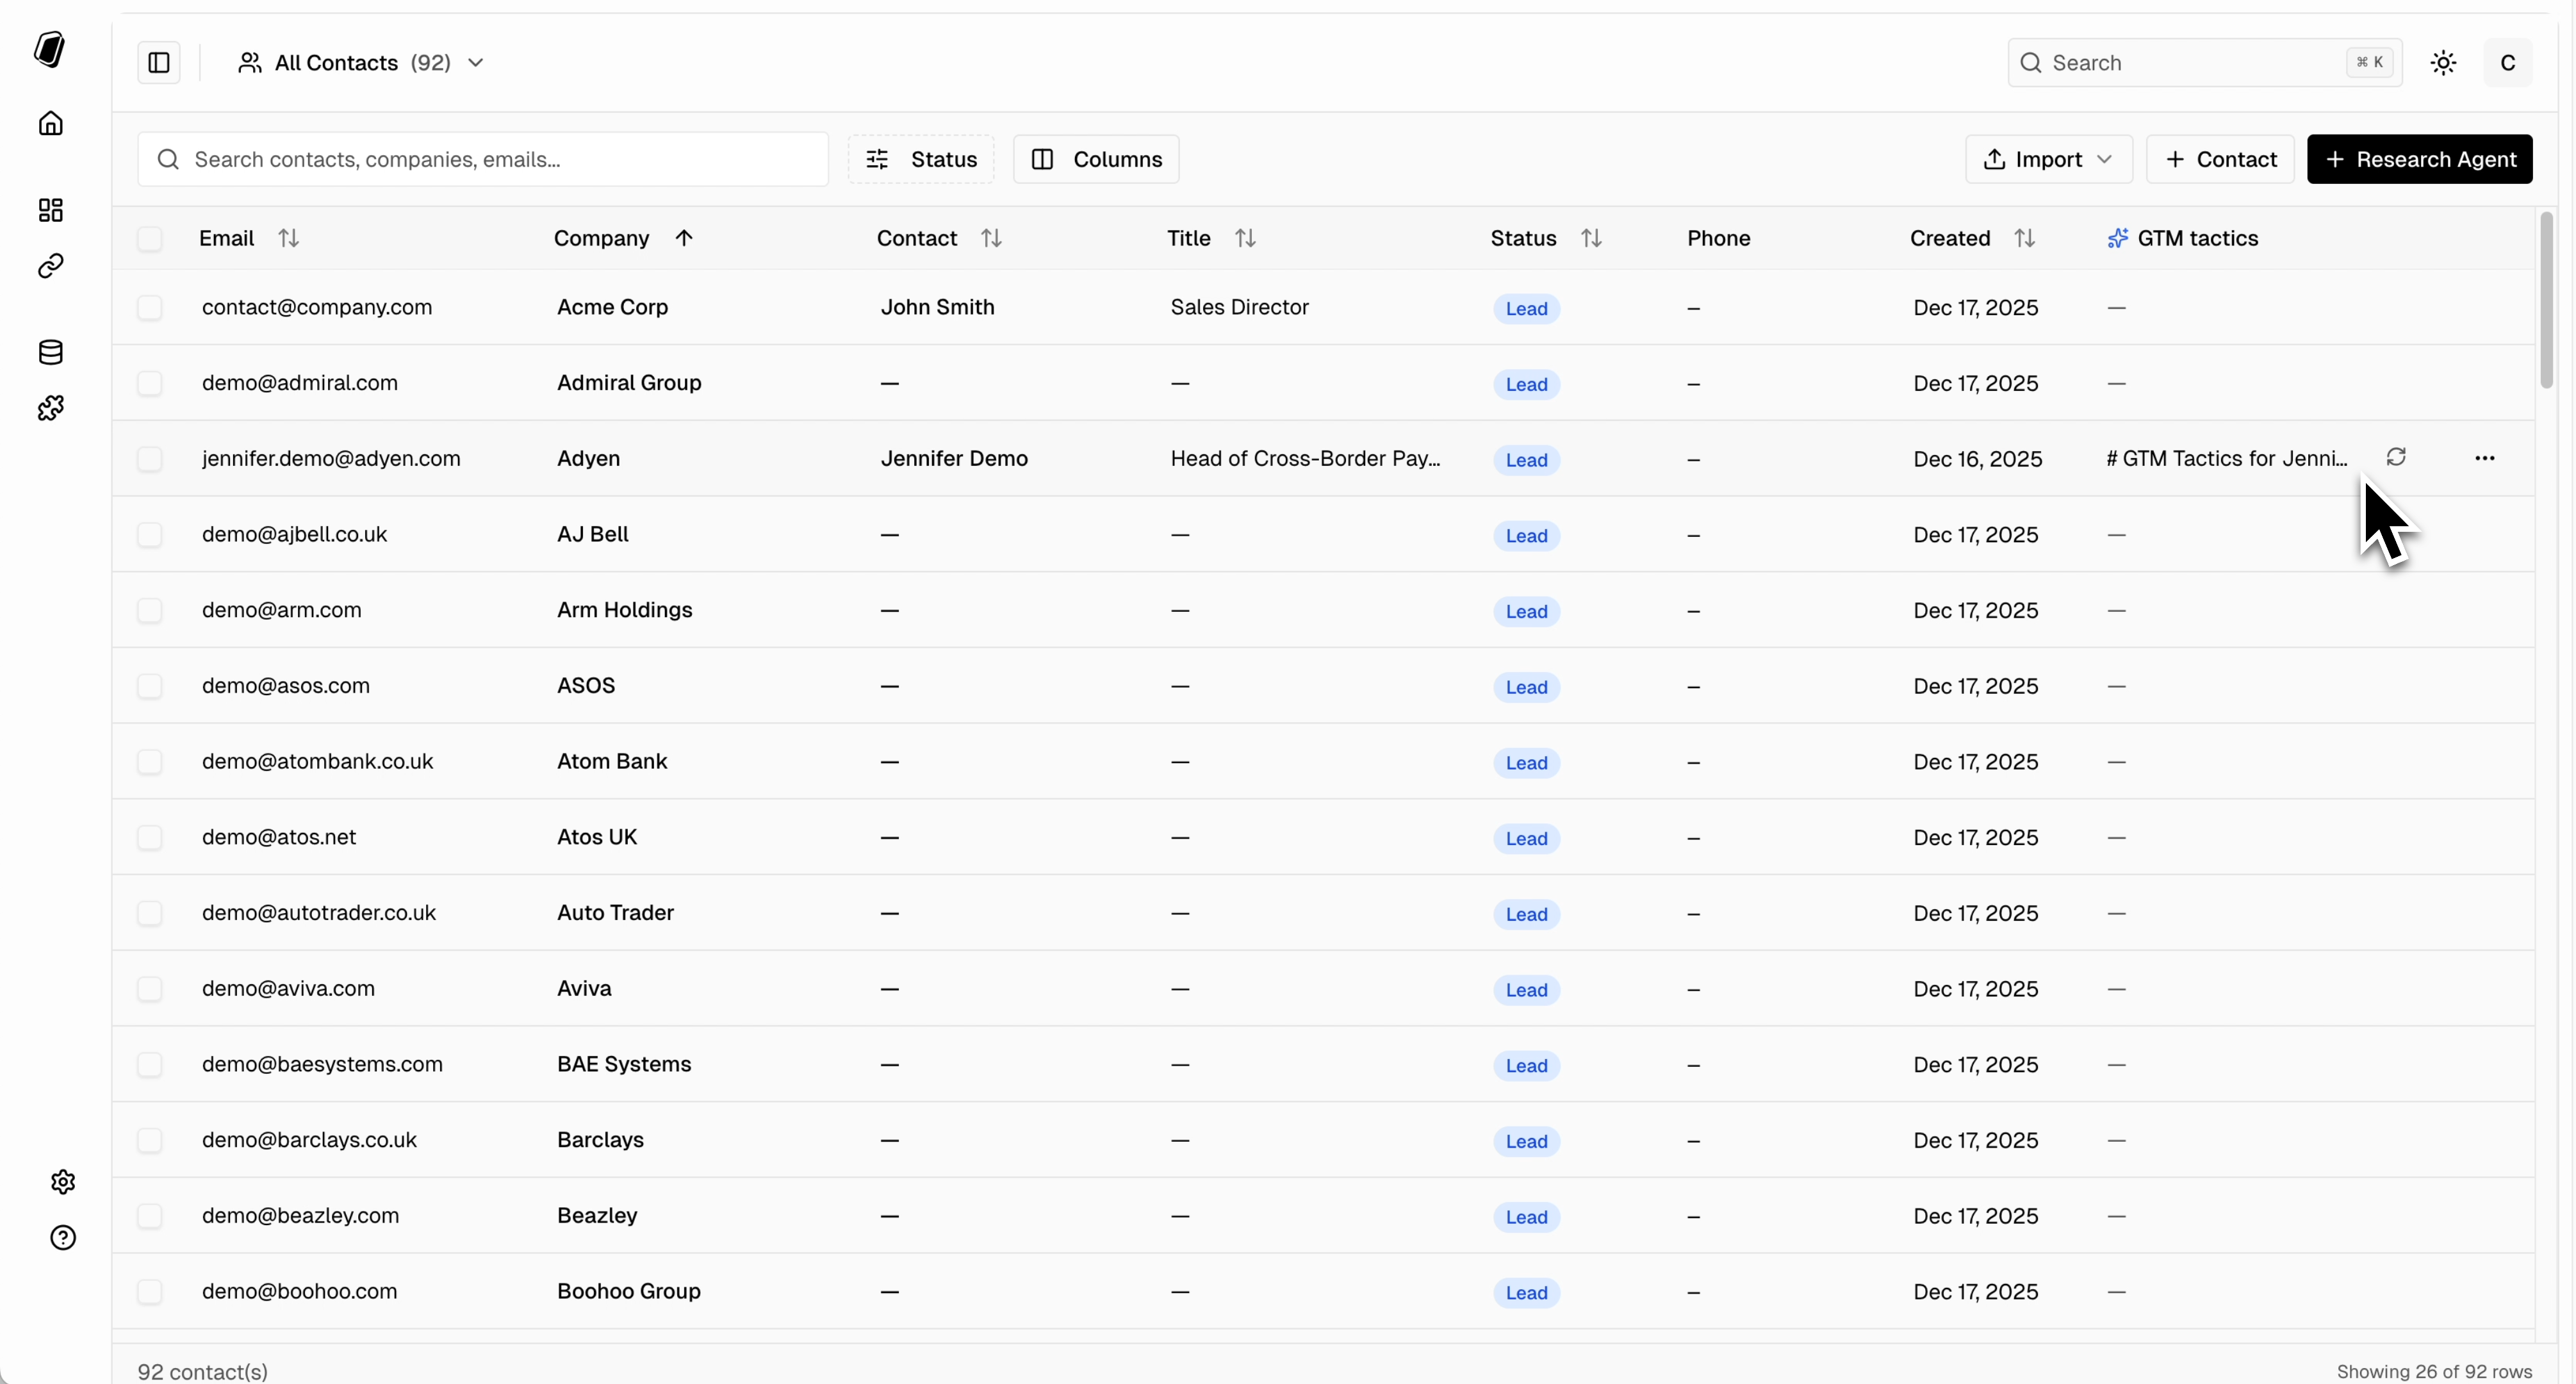 See [Enriching Data](/data/enriching-data) to learn more about adding enrichment columns.
## Bulk Actions
After importing or selecting contacts, you can perform actions on multiple contacts at once:
| Action | Description |
| ------------------ | ----------------------------------------------------- |
| **Add to List** | Add selected contacts to a new or existing list |
| **Create Links** | Generate personalized link sets for selected contacts |
| **Run Enrichment** | Execute AI research on selected contacts |
| **Delete** | Permanently remove selected contacts |
See [Enriching Data](/data/enriching-data) to learn more about adding enrichment columns.
## Bulk Actions
After importing or selecting contacts, you can perform actions on multiple contacts at once:
| Action | Description |
| ------------------ | ----------------------------------------------------- |
| **Add to List** | Add selected contacts to a new or existing list |
| **Create Links** | Generate personalized link sets for selected contacts |
| **Run Enrichment** | Execute AI research on selected contacts |
| **Delete** | Permanently remove selected contacts |
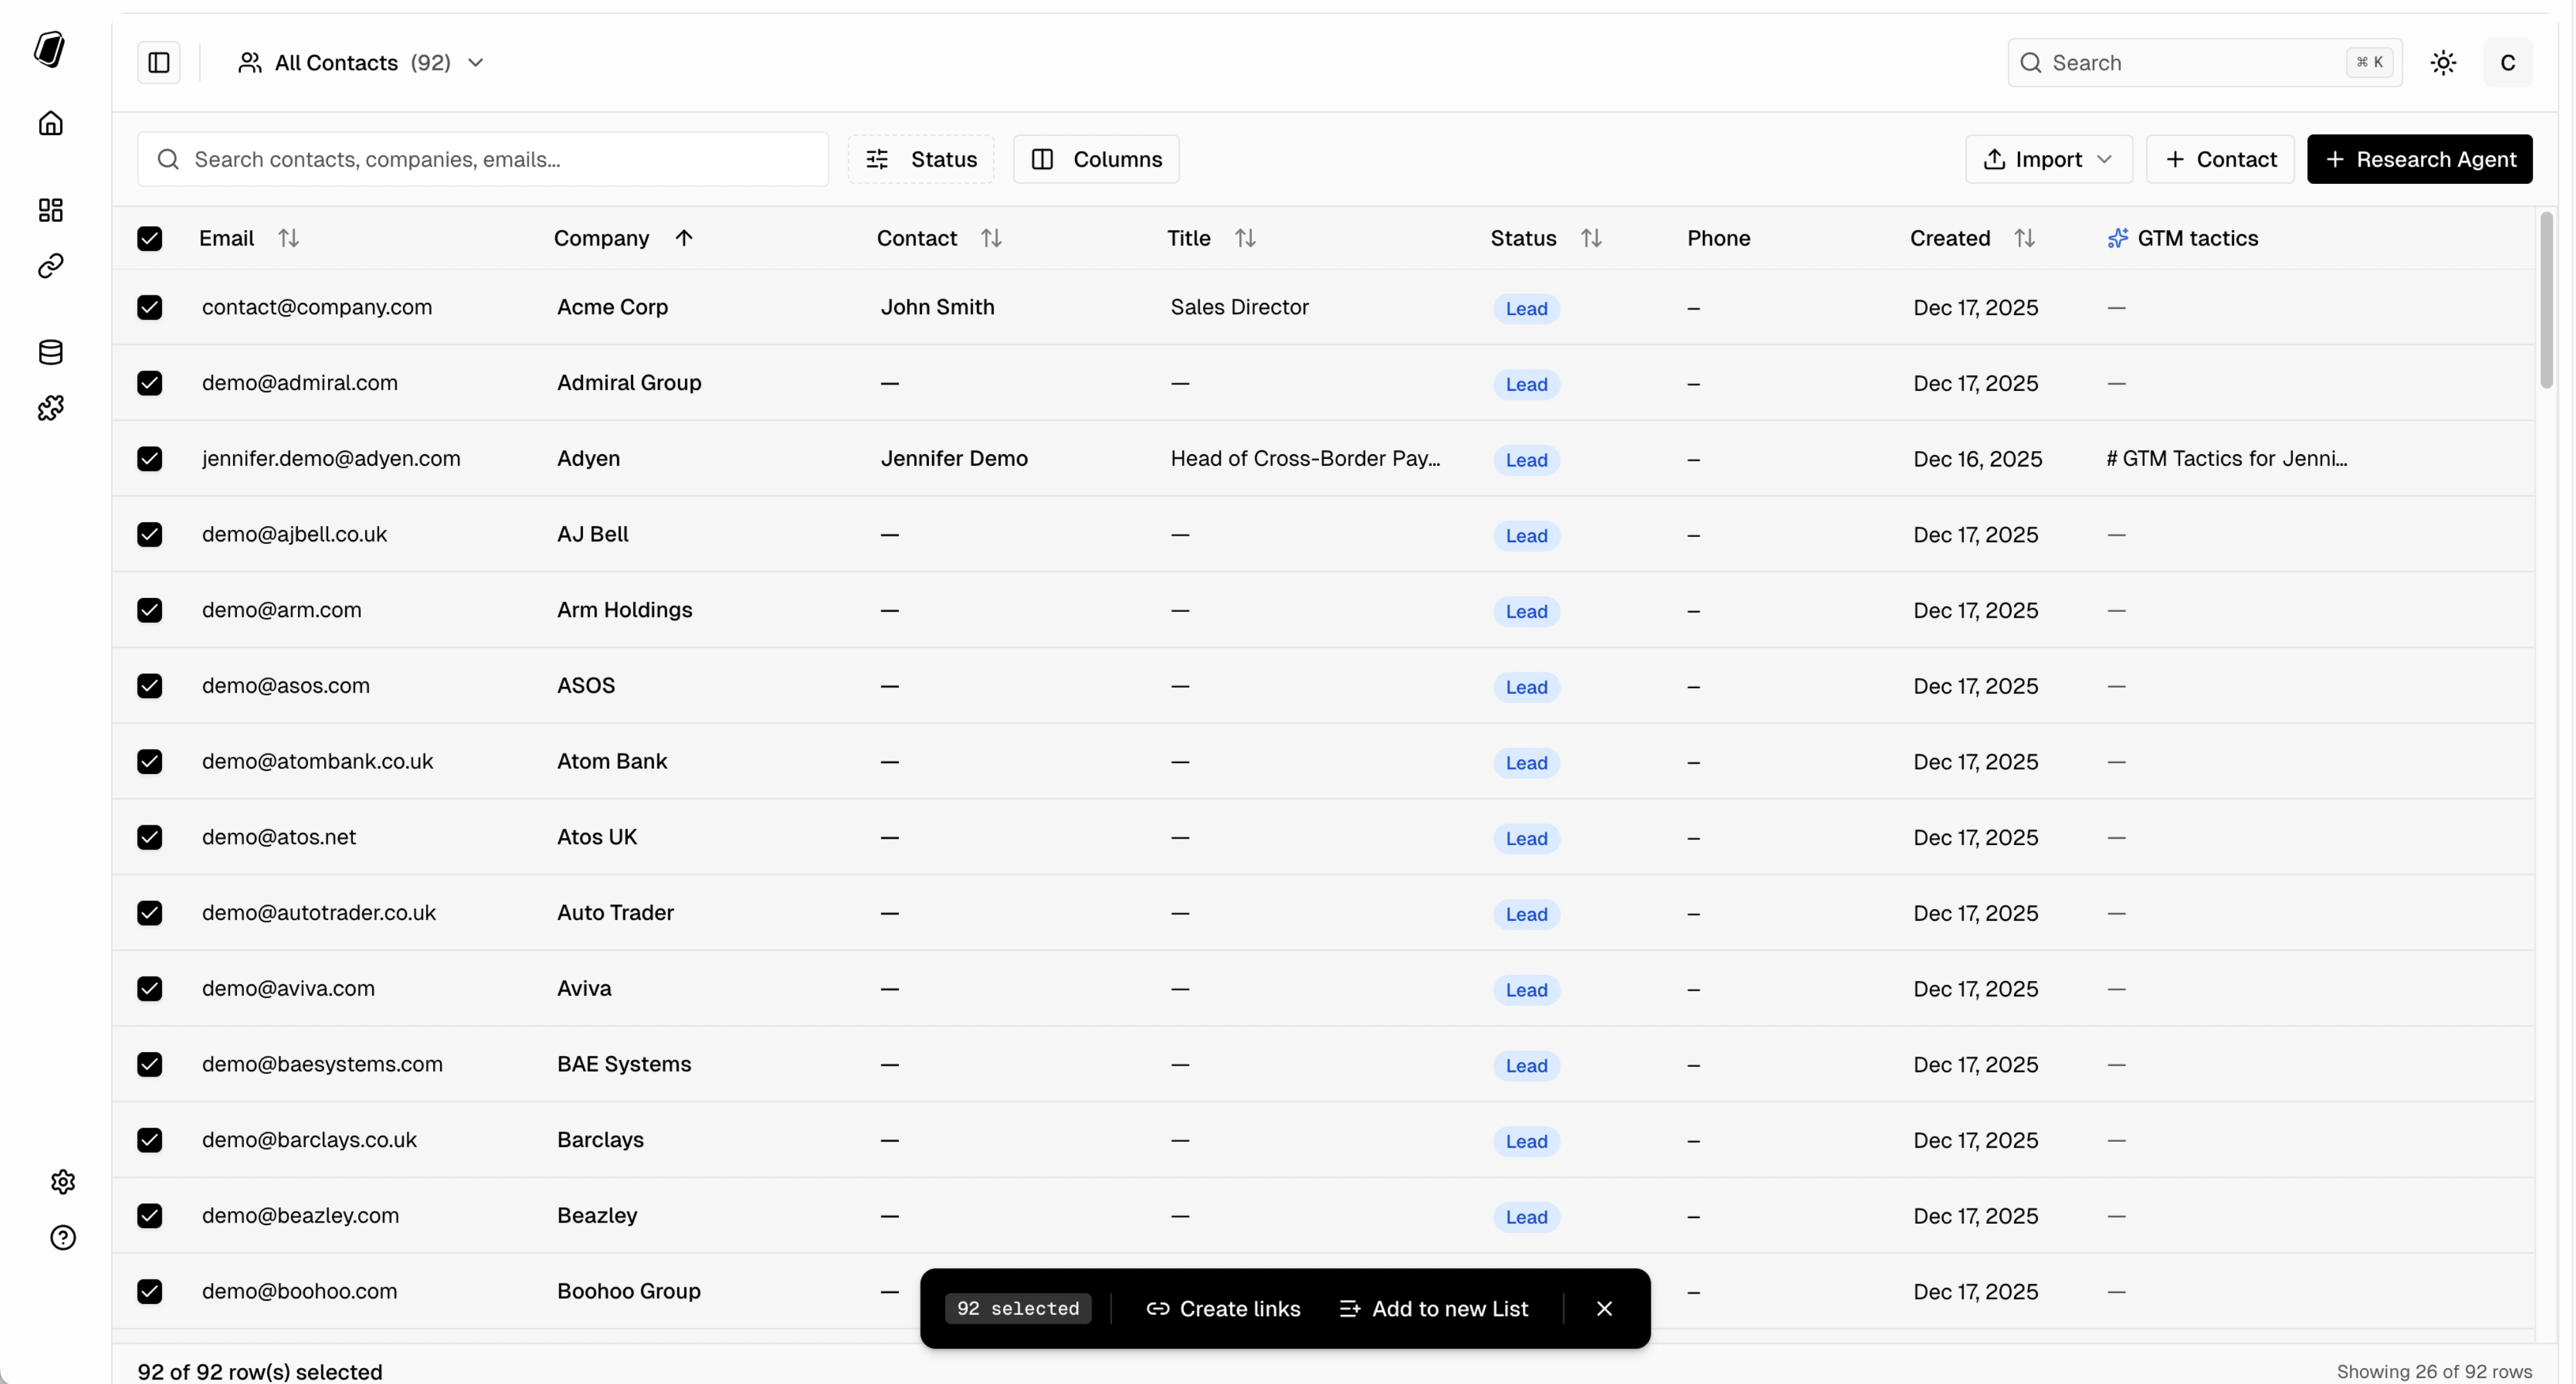 Use the checkboxes in the leftmost column to select contacts. Click the header checkbox to select all visible contacts.
A selection bar appears at the bottom showing the count of selected contacts and available actions.
Complete the action dialog (e.g., choose a list name) and confirm.
## Filtering and Sorting
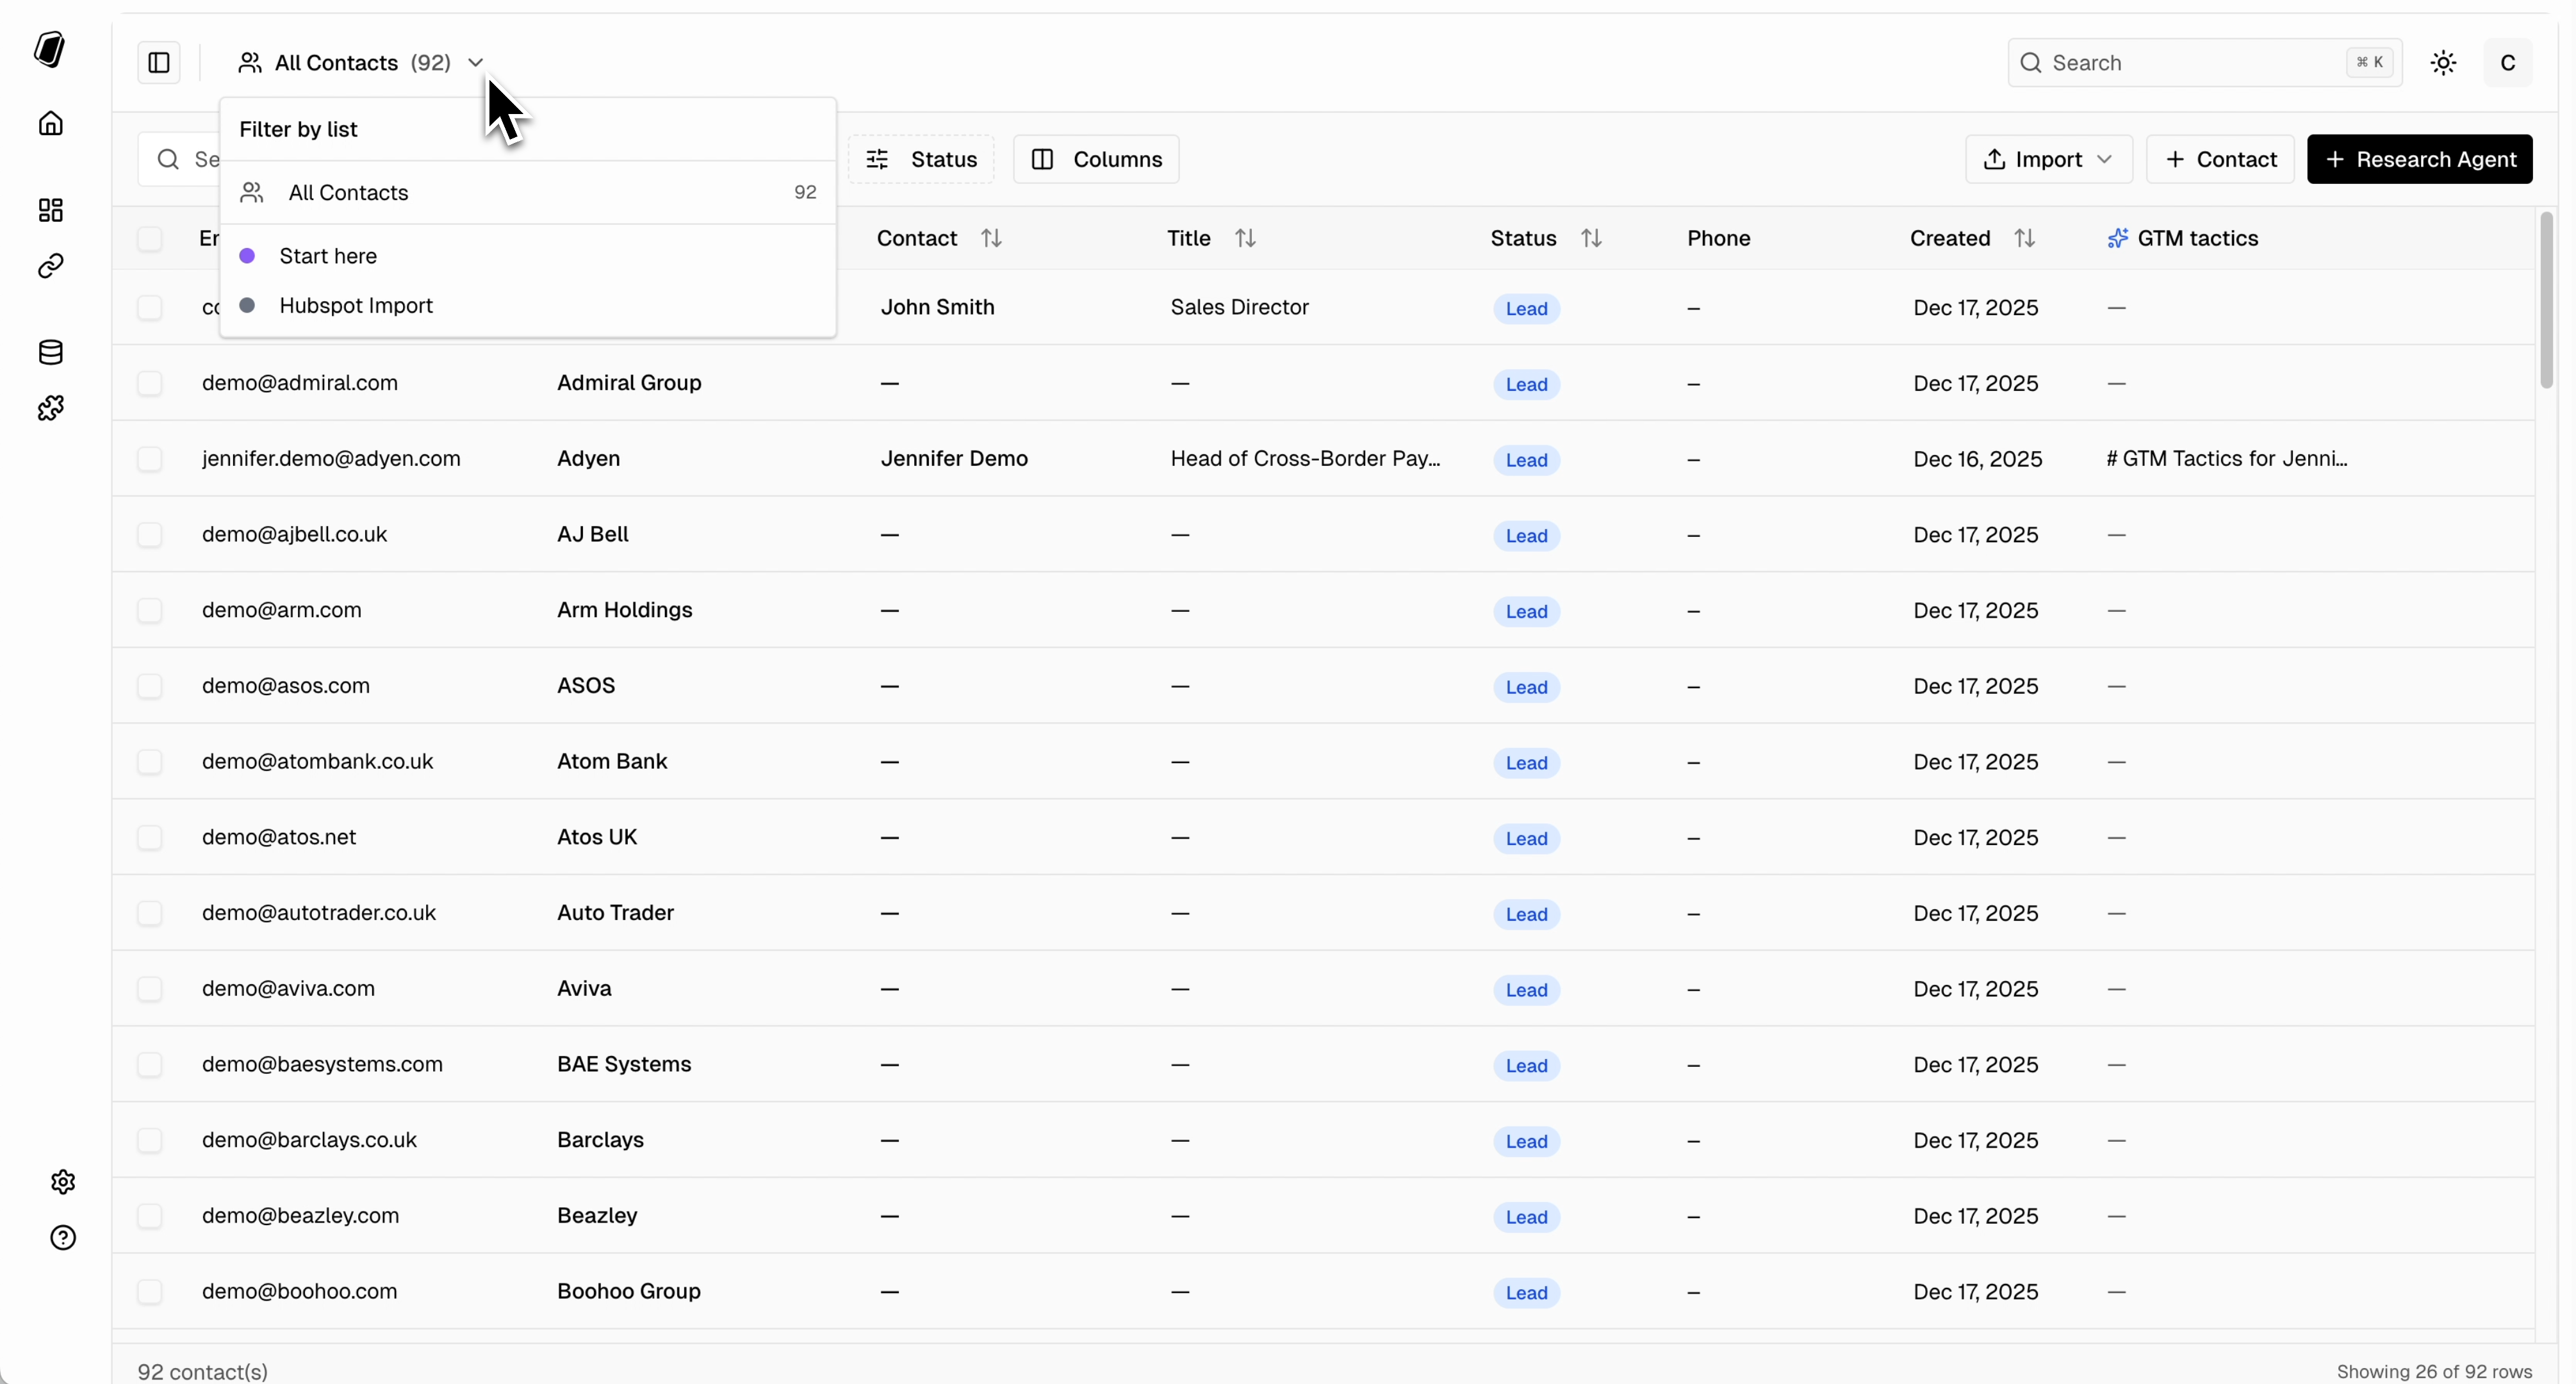
### Filter by List
Use the dropdown in the header to filter contacts by list membership:
* **All Contacts**: Show everyone
* **Specific List**: Show only contacts in that list
Use the checkboxes in the leftmost column to select contacts. Click the header checkbox to select all visible contacts.
A selection bar appears at the bottom showing the count of selected contacts and available actions.
Complete the action dialog (e.g., choose a list name) and confirm.
## Filtering and Sorting
### Filter by List
Use the dropdown in the header to filter contacts by list membership:
* **All Contacts**: Show everyone
* **Specific List**: Show only contacts in that list
 ### Sort Columns
Click any sortable column header to sort:
* **Email**: Alphabetical
* **Company**: Alphabetical
* **Contact**: By name
* **Title**: Alphabetical
* **Status**: By status type
* **Created**: By date added
Click again to reverse the sort order (ascending ↔ descending).
### Search
Full-text search across contacts is coming soon.
## Next Steps
Add custom fields and enrichment columns to your table
Organize contacts into targeted segments
Automatically research and enrich contact information
Visualize contacts in a pipeline view
### Sort Columns
Click any sortable column header to sort:
* **Email**: Alphabetical
* **Company**: Alphabetical
* **Contact**: By name
* **Title**: Alphabetical
* **Status**: By status type
* **Created**: By date added
Click again to reverse the sort order (ascending ↔ descending).
### Search
Full-text search across contacts is coming soon.
## Next Steps
Add custom fields and enrichment columns to your table
Organize contacts into targeted segments
Automatically research and enrich contact information
Visualize contacts in a pipeline view